I recently learned of the existance of the Web Share API: this browser feature provides a mechanism for sharing text, links, files, and other content to an arbitrary share target selected by the user. I have adapted the Share feature here in this blog to use the Web Share API where available. The API is currently supported by Edge, Safari and most mobile browsers.
I’ve been a passive user of Twitter for over two years now. My last tweet dates from 8 August 2021. Since the pandemic began, the number of tweets from conspiracy theorists has risen sharply and finally reached an unbearable level for me. I removed my Twitter client (Fenix) from the home page of my phone and ignored Twitter for months. I never really went back. After a while, I did check my timeline from time to time, but that too ended with the third-party client ban in January 2023.
It's officially over. No more Fenix on Android, iOS or macOS.
Fenix for iOS was suspended earlier today and I've removed it from sale.
I've had a great time working on these apps for the past 10 years and I'm very greatful for all your messages and support. pic.twitter.com/ibVZng78Ra
A few months later I started using Mastodon. It’s still a very small community, and so far it has none of the toxicity that X has developed. On Mastodon, I also came across a post describing how to host your exported tweets as your own archive. This is even more relevant as X forces users to sign in to browse tweets since June 2023.
Since I'm seeing a new wave of people saying they plan to leave Twitter, you may like my browser tool that takes the zip file of your Twitter export and returns a zip file of a web site that lets people browse and search your tweets. You can just upload the files wherever you normally host html and it'll work just fine.
As I did not like the look and feel of the suggested web application I did a little research and found tweetback. I exported my data from X, extracted my tweets, and published my archive at tweets.davidfuhr.de. I also removed the X widgets integration and replaced the links to my X profile with a link to my personal archive. I’d be happy to see more media outlets join the Fediverse to fuel discussions there and make X less relevant.
This article was originally published at esentri.com.
Scaling development
Microservices are well-known now for some years and are widely adopted. But the frontend oftentimes is still monolithic. This application structure often reflects on the team structure: there are several independent backend teams and one single frontend team. This also prevents backend development teams from delivering complete usable features - they always lack the frontend. To implement the frontend all changes must be done by the one frontend team. This makes it hard to scale development. By implementing micro frontends we can form full-stack teams that can ship complete features on their own. This is one of the reasons why ThoughtWorks placed micro frontends in the “Adopt” section of their famous Technology Radar for the third time in a row!
This article was originally published at esentri.com.
I recently implemented a simple maintenance mode for a REST API. Letting the web server return a 503 Service Unavailable sounds easy enough. But there was a catch displaying a maintenance page in our Angular client application.
Good documentation is the key to utilize an API. But it is difficult to keep documentation and development of you API in sync. Differences between implementation and documentation are often hard to spot. Learn how you can use Swagger to document you API first and profit by testing your implementation against your documentation and vice versa. No duplication needed!
Swagger Logo
I recently started planning a new RESTful API for my company. After some initial discussion on the scope and which API endpoints are needed I set out to write the specification in Swagger 2.0. This provided for a good starting point to the further refinement discussion. It also proved very useful to exchange information with our frontend developers in charge of implementing the first API consumer.
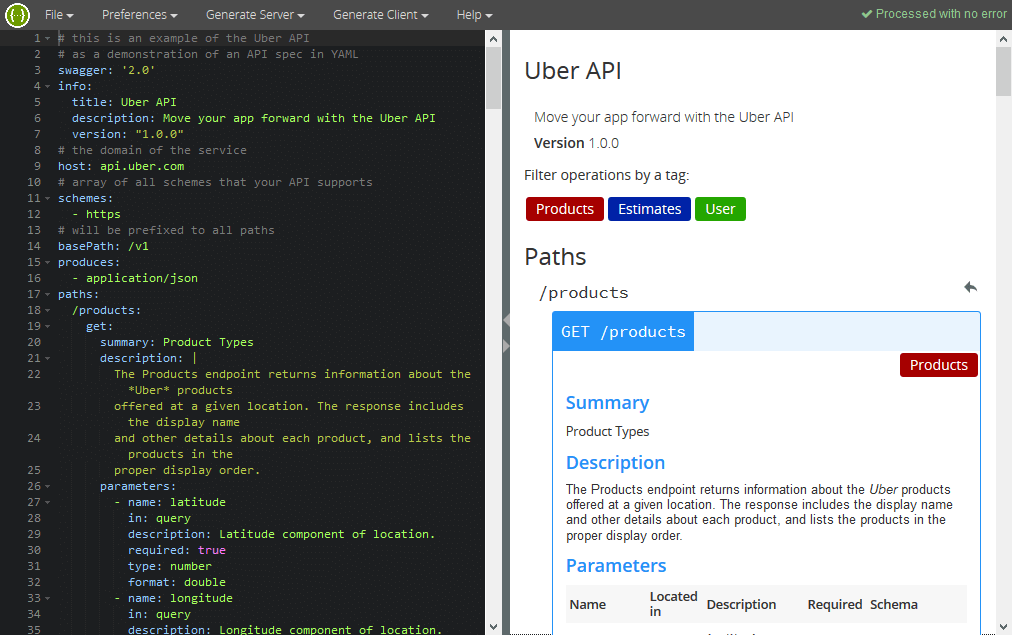
Swagger Editor
At first we started using Swagger Editor and YAML as format (because it is the lingua franca of Swagger Editor). Swagger Editor is a great tool to get started using Swagger. It runs directly in your browser, validates your YAML input and renders a beautiful interactive web interface. We were sending the swagger.yaml file around and I was maintaining the authoritative version of the file. This worked well for the start but it was obvious to us that we needed a tighter coupling to the application and track the file in sync with the implementation.
I had worked with NelmioApiDocBundle before to integrate Swagger with a Symfony application and it is a wonderful tool to document your existing API code. But as NelmioApiDocBundle generates the Swagger file from the annotated source code the source must exist prior to the documentation. This did not match our desired workflow. What’s more, the future of NelmioApiDocBundle seems to be a bit uncertain as the William Durand, the current maintainer, thinks of deprecating the bundle1.
I am thinking about slowly deprecating #NelmioApiDocBundle (feature-freeze first, then EOL). Thoughts?
As I only needed a view component for my Swagger file and had no need for the annotation stuff SwaggerUIBundle was good enough for the job. That made it necessary to convert my Swagger file from YAML to JSON, but that’s no big deal as the Swagger Editor has an export option for JSON. For the Bundle configuration take a look at the installation instructions for static JSON files. This is what my routing configuration looked like:
As I started implementing the first endpoints I also created the first Test Cases in parallel with development. And because I am lazy, I did not want to repeat myself and write the same definitions I already had in my Swagger file for my test assertions again. So I was looking for a way to reuse my Swagger specification in my test’s assertion.
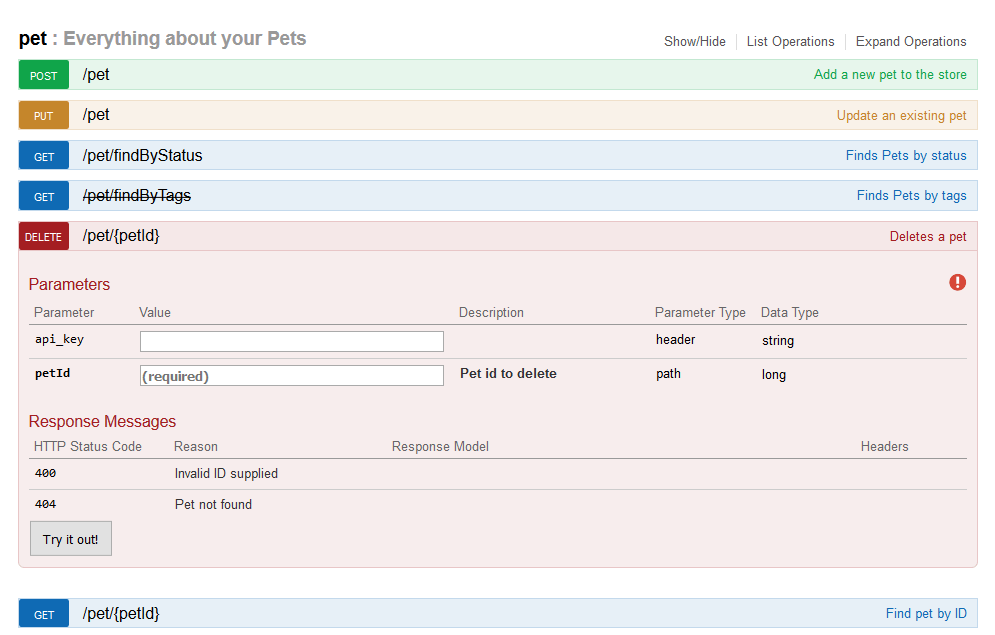
Swagger UI
The model definitions of Swagger 2.0 are valid JSON Schema which aims to be similar as XSD or DTD for XML. And fortunately there is already a library for PHPUnit JSON Schema Assertions. The only problem was I had a single huge Swagger file and I found no way to validate my API response only against a part of the big Swagger definition. JSON Schema allows splitting up the definition into multiple files and referencing these files using $ref. For more information about Referencing take a look at the OpenAPI Guidelines for Referencing, How to split a Swagger spec into smaller files and Structuring a complex schema.
After splitting up the file SwaggerUIBundle did not work anymore because it has problems handling and resolving the JSON references correctly. But that’s not a problem a of SwaggerUI, it’s only a problem of the bundle. As workaround I moved my Swagger files to src/AppBundle/Resources/public/swagger so that Symfony takes care of populating my files in the web root and I adjusted the SwaggerUIBundle configuration to just take that static entry point.
If your JSON Schema uses several nesting levels you might need to adjust the $maxDepth of the RefResover (the component that resolves your $ref).
JsonSchema\RefResolver::$maxDepth=10;
This got me what I want. Whenever there is a change either in the documentation or the implementation it will break the tests and the developer has to make sure both align. This ensures that the documentation is updated on code change and is maintained and also provides easy tests for new endpoints as a bonus!
If you are using NelmioApiDocBundle and looking for alternatives, read this insightful article by David Buchman who coverted his NemlioApiDocBundle annotations to swagger-php annotations. ↩
Hier war in den letzten Monaten mal wieder Beitrags-Flaute, was vor allem daran liegt, dass ich seit etwa vier Monaten an einem Zend-Framework-Projekt entwickle und nur noch sporadisch mit Magento zu tun habe. Deshalb geht es auch heute nicht um Magento direkt, sondern um die Cache-Komponente von Zend Framework. Magento-Entwickler müssen jetz nicht gleich aufhören zu lesen, denn Zend_Cache bildet auch die Basis für den Cache in Magento.
Die verkürzten URLs von tinyurl und Konsorten mögen ja ganz nett sein, wenn man twittern will, aber ansonsten gleicht das meine Meinung nach eher einem Minenfeld: keiner weiß so genau was einen da erwartet.
Genau dieses Problem geht das Firefox-Addon Long URL Please an. Damit werden die verkürzten URLs aufgelöst und in der Originalform angezeigt.
Wer übrigens behauptet, das wäre auch praktisch um das Layout bei langen Links zu erhalten verwendet nur schlechte Software. MusicBrainz! verkürzt den angezeigten Link nämlich einfach, was der Funktion und Transparenz keinen Abbruch tut, da der vollständige Link ja immernoch vor'm draufklicken in der Statusleiste angezeigt wird.
Mit ging es schon oft so, dass ich einen Artikel oder ähnliches gelesen habe und dabei die interessanten Links in neuen Tabs im Hintergrund geöffnet habe. Am Ende des Artikels schließe ich dann den ursprünglichen Tab und lese in den neuen Tabs weiter. Wenn ich dann nochmal zurück will, geht das normalerweise nur über den "normalen" Verlauf und nicht über die Zurück-Taste im Browserfenster, weil die Tabs ja neu sind und somit keinen Verlauf haben.
Genau dieses Verhalten wird durch die Firefox-Erweiterung Tab History geändert. Neue Tags "erben" damit den Verlauf des öffnenden Tabs und somit lässt sich auch in den neuen Tabs Vergangenes einfach über den Zurück-Knopf zurückholen.
Nachdem ich letzte Woche mal mit der Firefox-Erweiterung vimperator installiert habe und es mir dann doch zu viel Einarbeitung war, hab ich gerade im Linux-Magazin einen Hinweis auf die Extension Lol (ja, toller Name :p) gefunden. Damit werden - wie bei vimperator - die Links mit Ziffern verknüpft und lassen sich so direkt per Tastatur ansteuern.
Die nützliche Firefox-Extension zum JavaScript debugging Firebug dürfte inzwischen weithin bekannt sein. Firebug selbst ist auch wieder erweiterbar und gestern bin ich auf eine Firebug-Extension für PHP mit dem sinnigen Namen FirePHP gestoßen. Damit lassen sich Logging- oder Debug-Ausgaben direkt auf die Firebug-Konsole ausgeben. Damit die Kommunikation (über eigene HTTP-Header-Zeilen) funktioniert, muss auf dem Server allerdings das Output-Buffering aktivert werden. Eine Anleitung gibt’s auf der FirePHP-Homepage.
Für ein Projekt musste ich mich vor kurzem mit dem Thema Videos auf Webseiten
auseinandersetzen. Am einfachsten und massentauglichsten erschien mir da die
Variante mit einem Flash-Player.
Mit dem freien FFmpeg Encoder (LGPL) und den
unter der GPL lizensierbaren Flowplayer hat man
eigentlich schon alle benötigten Werkzeuge zusammen. Nun braucht man
natürlich den Ausgangsfilm und muss ihn ins
Flash-Video-Format konvertieren:
Wenn man einen Screenshot einer Webseite erstellen will, kann das ohne passende Hilfsprogramme recht unangenehm werden. Aber zum Glück gibt es ja Hilfsprogramme!
Das Firefox-Plugin FireShot macht nicht nur Screenshots, sondern bringt auch gleich noch einige Bearbeitungsfunktionen mit. Damit kann man einfach Bemerkungen und andere Hinweise im Bild unterbringen. Einziger Wehmutstropfen: Das Ding läuft nur unter Windows...
Die deutlich weniger umfangreiche Alternative, aber dafür recht platformunabhängig, stellt die Erweiterung Screengrab! dar. Screenshots lassen sich wahlweise von der ganzen Seite, vom sichtbaren Bereich oder von einem auswählbaren Bereich machen. Da die Erweiterung mit der Firefox-Canvas-Methode arbeitet, muss aber für die entsprechende Seite Javascript erlaubt sein. Mit installierter Java-VM sollen sich auch Screenshots von Flash-Animationen machen lassen, aber das habe ich noch nicht getestet. Das Plugin steht übrigens unter der GPL.
Irgendwie sind mir bei den Farbangaben die HEX-Werte lieber als die Notation mit rgb(0,0,0) und daher ist immer wieder eine Umrechnung nötig. Unter Windows kann man das mit dem Taschenrechner erledigen, aber unter Linux haben die minimalistischeren Windowmanager keinen Taschenrechner dabei, über den sich diese Aufgabe mit Klicki-Bunti erledigen ließe. Nach kurzer Suche habe ich dann eine Zusammenfassung nützlicher Shellbefehle gefunden, die unter anderem den gewünschten Befehl enthielt:
$ echo'obase=16; ibase=10; 244'|bc
F4
Befehl zur Konvertierung von der Basis 16 zur Basis 10
Ebenfalls schon etwas her, aber noch nicht soo lange (letzte Woche), ist meine bestandene PHP5-Zertifizierung. Seitdem darf ich mich offiziell mit dem Titel Zend Certified Engineer schmücken.
Gerade ist mir aufgefallen, dass meine Installationsdomain (www.)s9y.davidfuhr.de (s9y ist die Kurzform für Serendipity) noch in den Tag-Links enthalten war und folglich auch bei Google gelistet wurde.
Um die Domain aus dem Google-Verzeichnis zu bekommen und trotzdem die Links nicht zu verlieren habe ich halt meine .htaccess um 3 Zeilen erweitert... Ich hoffe damit ist jetzt wirklich alles einheitlich auf www.blog.davidfuhr.de.
Um möglichst wenige Links zu brechen (denn: Cool URIs don’t change), habe ich per .htaccess einige Weiterleitungen eingerichtet. Zum einen Mal für die umgezogenen Artikel statische Regeln, da mir dafür kein passender Algorithmus eingefallen ist. Da ich jetzt keine Kategorien mehr habe, sondern Tags, werden die Kategorieseiten auf Tagseiten abgebildet, die Archive und Montatsübersichten könnten dagegen ja 1 zu 1 weitergeleitet werden.
Ich habe sie installiert: die Blog-Software mit dem unaussprechnlichen Namen: Serendipity. Und weil der Name so kompliziert ist, lautet die URL schlicht und einfach s9y.org. Der Vorteil gegenüber Wordpress ist in meinen Augen, dass die Software einfach um eine vielen schlanker wirkt als das hochgerüstete Wordpress. Durch Plugins lässt sich (fast) jede fehldende Funktionalität nachträglich installieren und damit reicht das für meine paar Einträge im Jahr auch gut aus. Der automatische Assistent zum Importieren der WordPress-Einträge hat sich leider an den Umlauten verschluckt und da ich mein Blog eh schon länger mal entrümplen wollte, habe ich ein paar Einträge von Hand migriert und der Rest verschwindet einfach im Nirvana ;-)